 |
| Vegetable ivory buttons can be carved and dyed into small pieces of art! |

Wednesday 7 December 2016
Vegetable ivory - Vegan and eco friendly buttons from early 20th century
Although named after ivory, a controversial material from today's perspective, it has nothing to do with African wildlife. Tagua nuts come from corosso palm tree in south America. They are 100% vegetable and sustainable material, only resembling the authentic ivory in colour, hardness and the grain, which is a bit more tree-like. However, since modern plastic was introduced, they have become less and less popular.
Friday 11 November 2016
How to make a sew-on duffle coat toggle closure - tutorial
Duffle coats are all the rage, back from 1970 (and 1990s, and... well, they ARE practical and men love their casual sporty air). Today I am going to show you how to make a complete sew-on closure for a duffle coat, using toggle buttons and leather. We will also need some leather straps or similar.


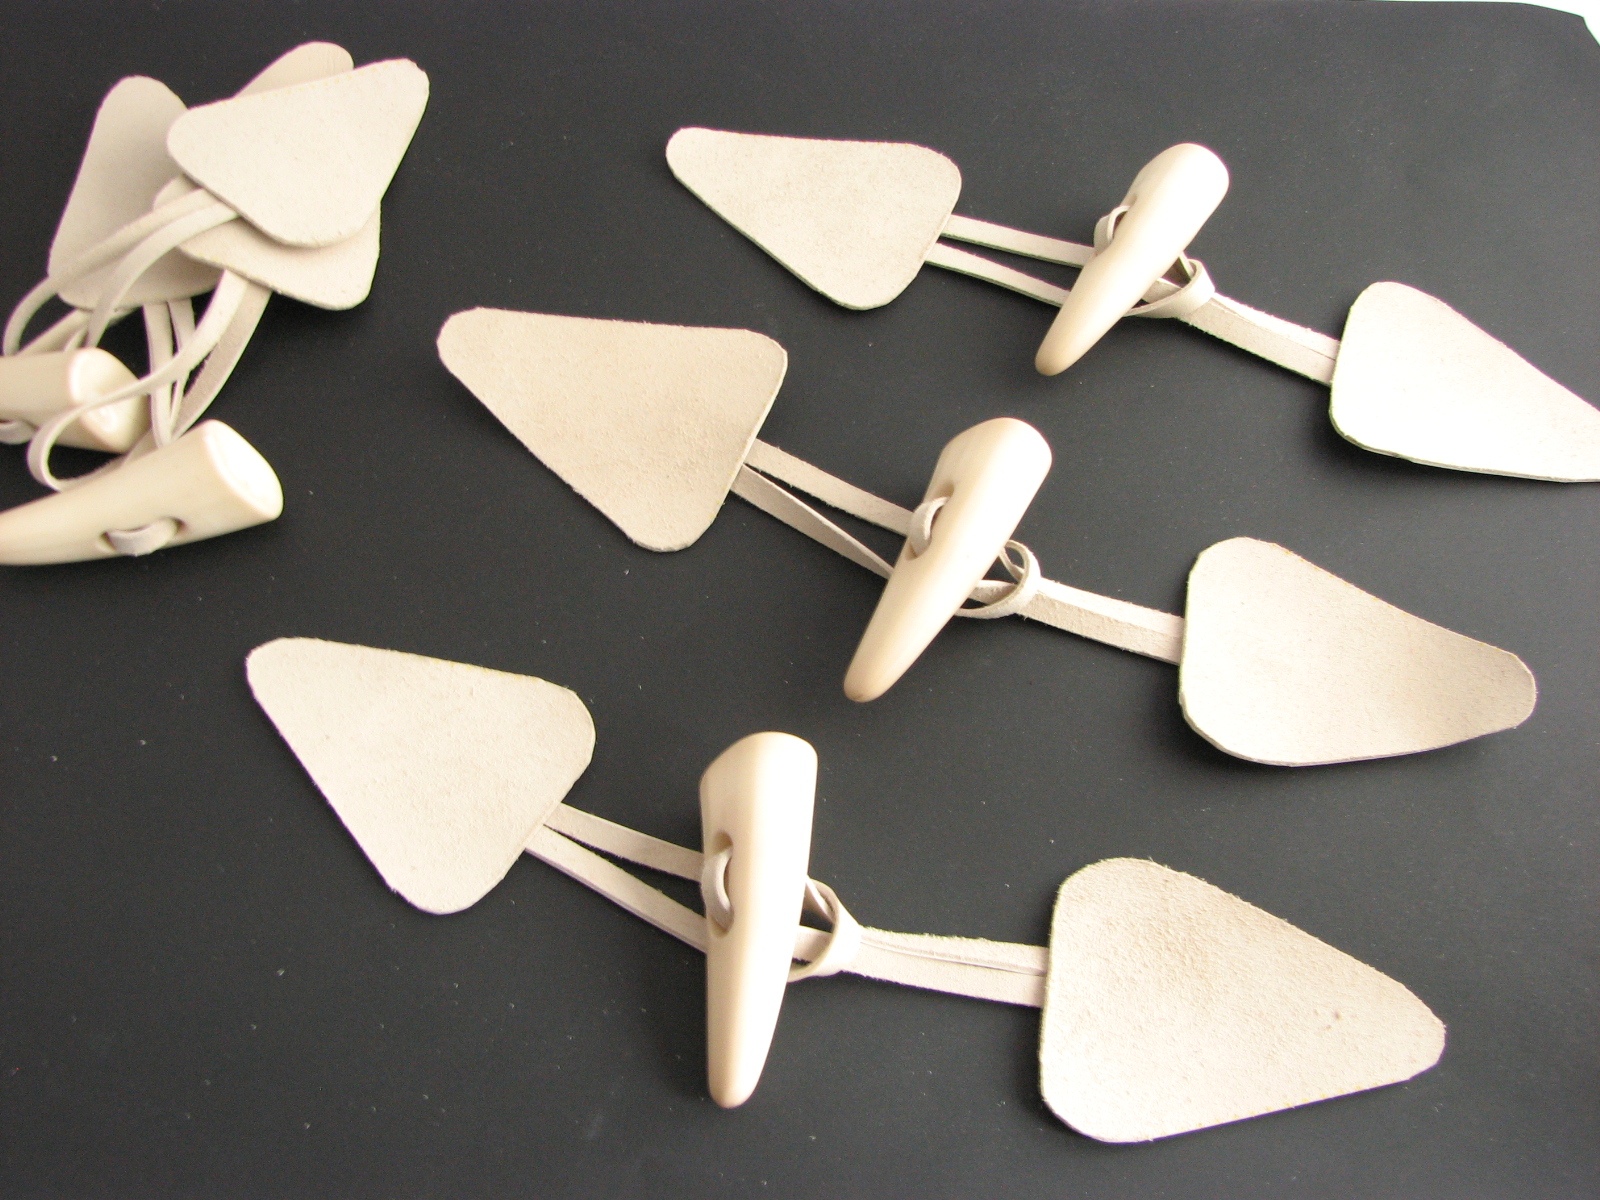
First you need to decide on the shape of the leather pads. They may be square (that's the easiest to cut) or triangular and rounded on the corners. This is my favourite, though I prefer elongated triangles personally, like those you can see in the pictures above. If you are not inspired to design your own shape, you can use the measurement from the picture below to trace them onto your leather.

Once we have chosen the style and colour, and also decided if it is going to be made of genuine leather (I buy mine from a remnant basket, and one such piece is usually more than enough) or faux leather (a cheaper option, but perhaps not as durable), we can copy the shape of the pads onto the wrong side of the leather. Faux leather works with pencil and colour pencils, but for genuine leather you will need to use a pen. Make sure you are ON THE WRONG side. You can also draw the pads directly on the piece of leather. I traced my triangles using the dressmaking copying paper and traced them the same way as I do with fabric.

I like to use best the space and use up all the leather, so I copy the pattern pieces very close to each other. This also saves time and work when cutting them out.

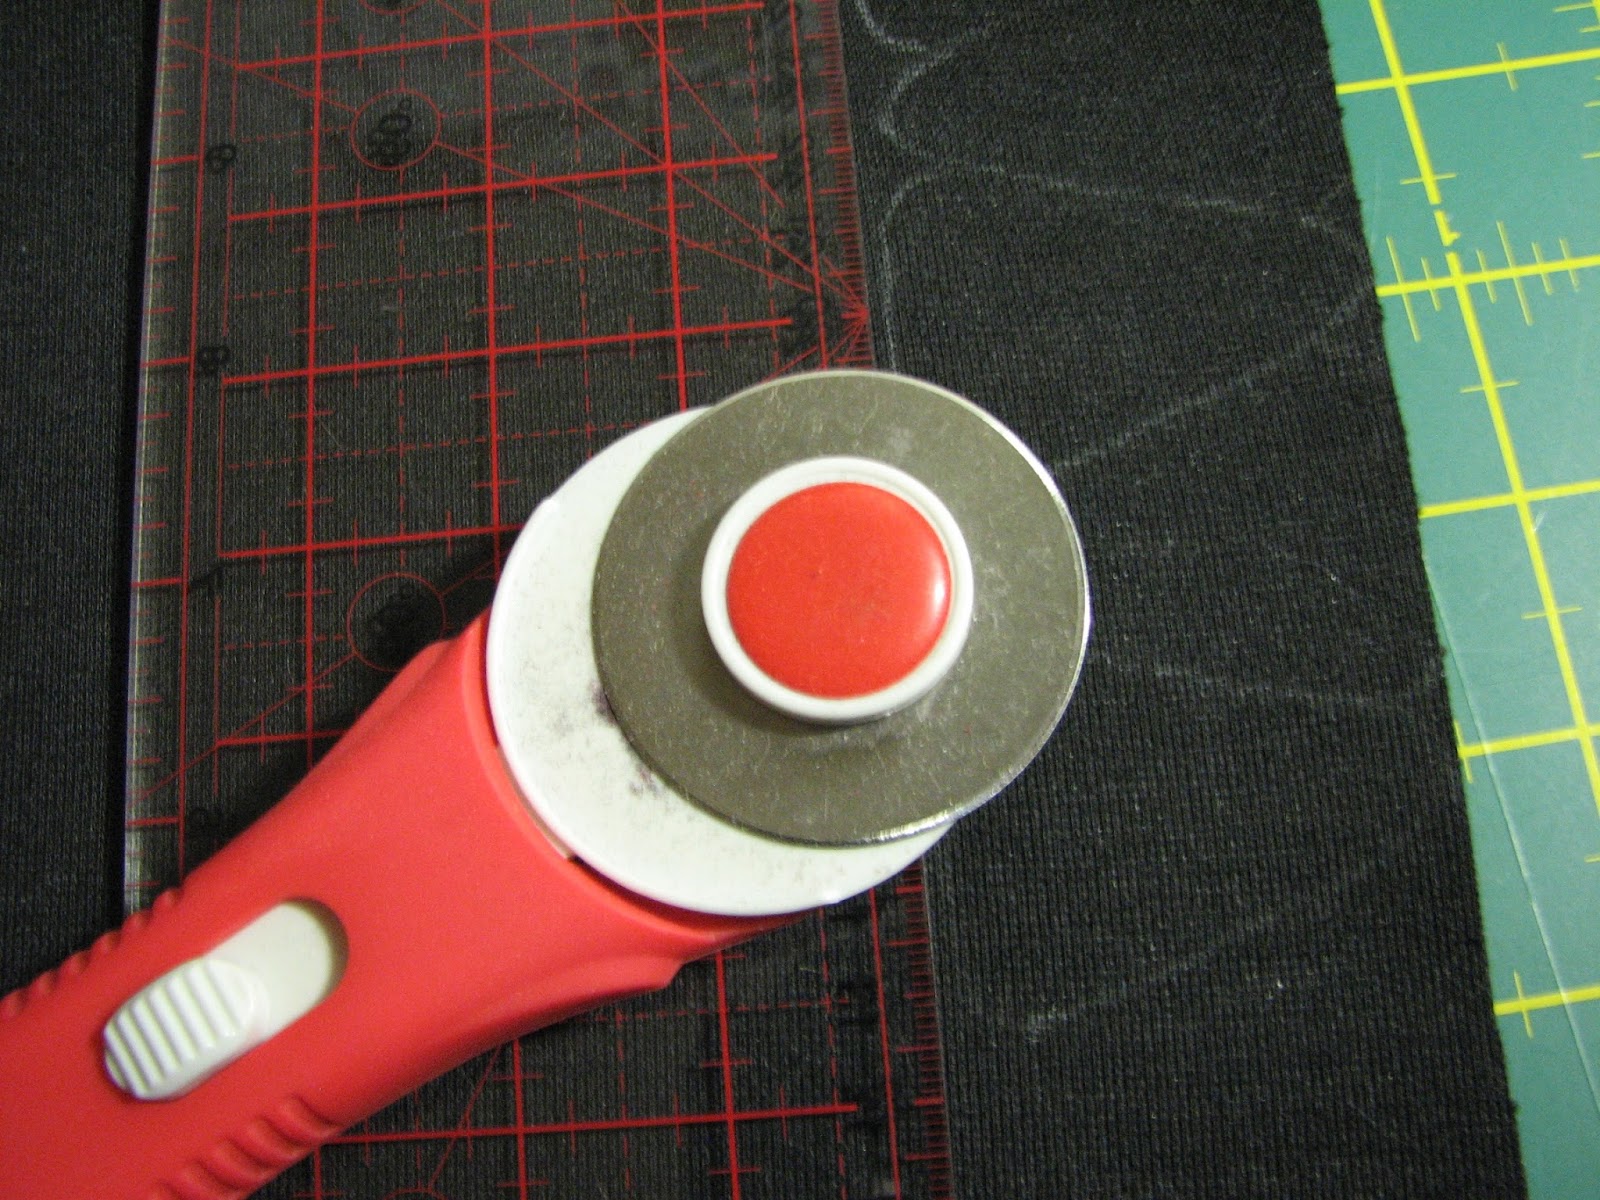
Once we are ready, and we have enough pieces (just make sure you have drawn a few extra pieces in case anything goes wrong while cutting), we can start with the rotary cutter. It is very useful as it cuts well through any leather (and also your skin...). To finish, we can use a smaller cutter or very sharp scissors. These will not work, though, with thick leather, but on the other hand, will be great for faux leather.


Now we will need the straps. It is really up to you how long they will be. Make sure you take into account the size of the toggles or buttons you are going to use, as sometimes extra length is needed. I will use 11 cm - 4 3/8" long straps. Cut your leather strap into even pieces. You can also make them from leather, for better matching. These should be wide enough to prove strong, but thin enough to go through the holes of your buttons! I used 4 mm - 3/16" wide straps.

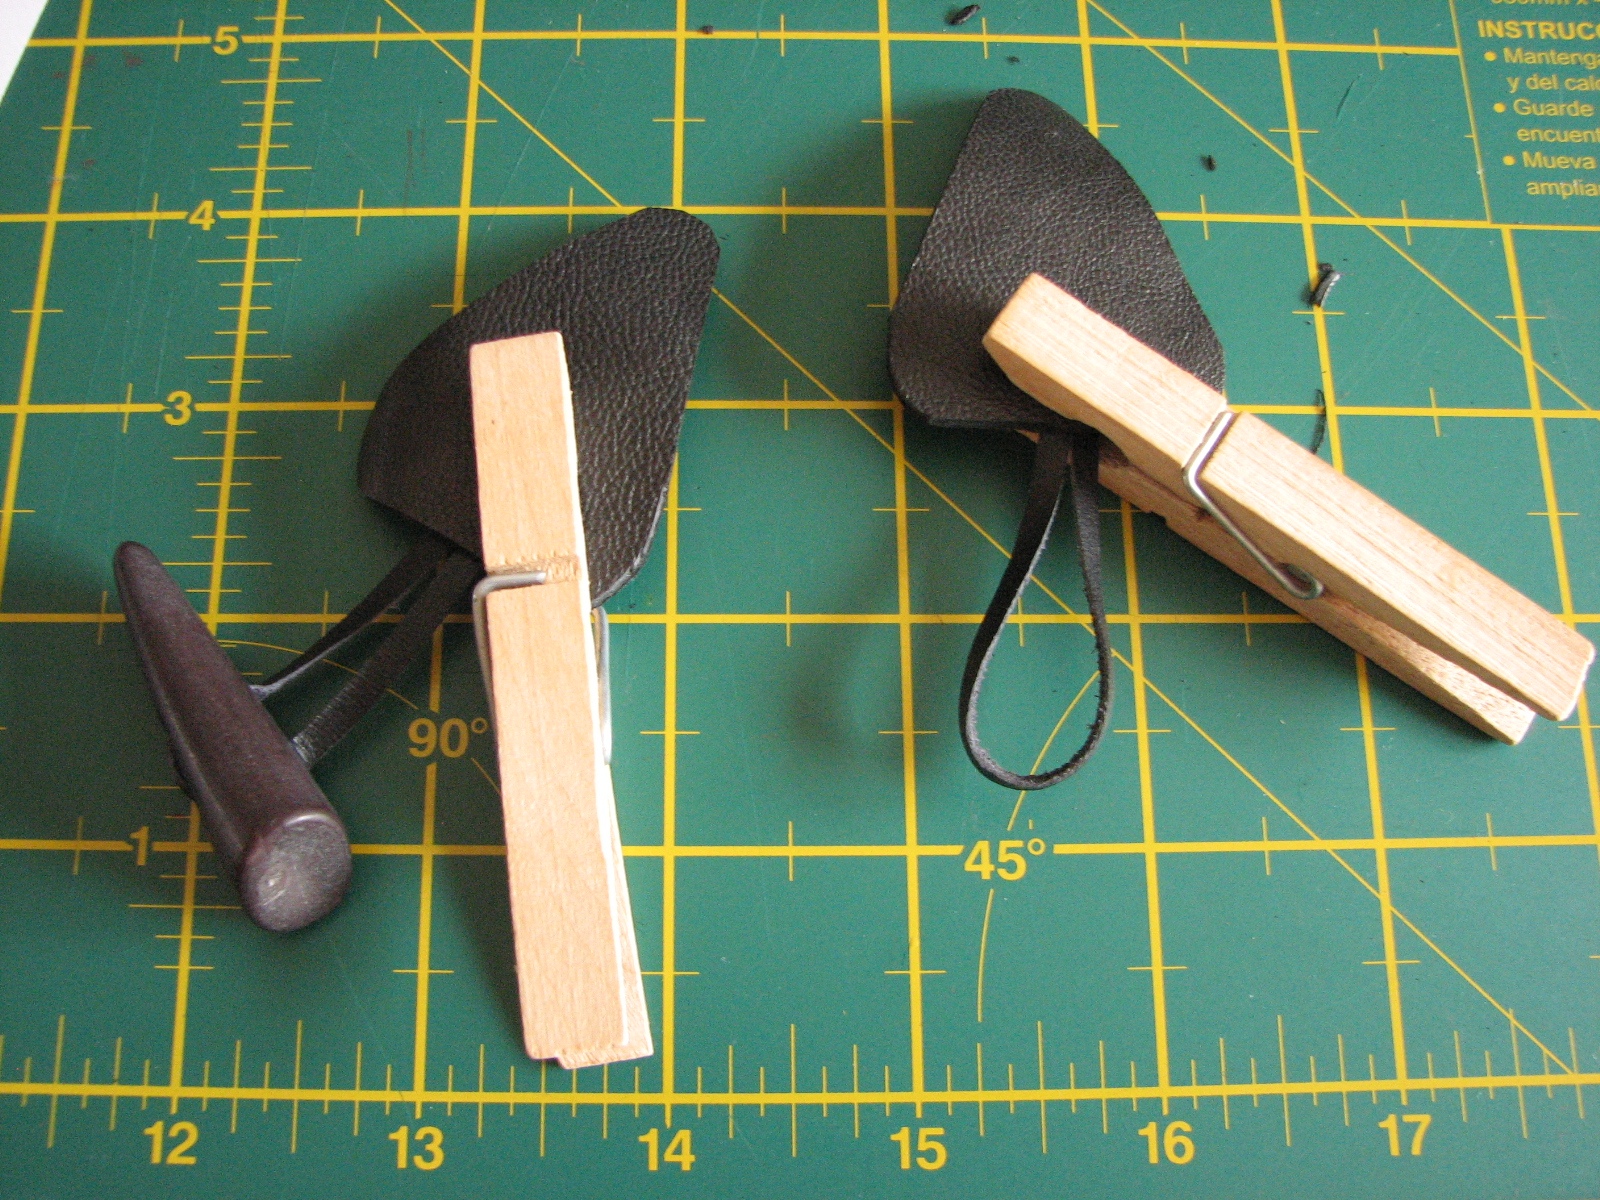
The next step is to glue the straps to the pieces of leather. This is temporary, so you do not need to use a very strong glue. Glue gun is OK as long as you use just a tiny bit of it, as it may create bulk you do not want. If you are using super glue, make sure you apply just a bit, and towards the center of the pad, as it hardens and you still need to sew the closure to your coat. The best is of course a special glue for leather. Then I use pegs to make sure they are pressed well and long enough. Remember to thread the buttons BEFORE gluing, and also, make sure they are all facing the same way.


Make sure you have made one the same number of loops as you have buttons. Now we are ready to sew them onto the coat. My advice is to glue the closures temporarily to the wool - otherwise who know how they will end up. Here, machine-sewing is as good as hand-sewing. If your closures are made of genuine leather, it is advisable to make holes beforehand for hand stitching. If you are machine-sewing them, remember to set the stitch length to 3, for example, as to short stitch will make the closure prone to breaking. I use special needles for leather, which I do recommend.


First you need to decide on the shape of the leather pads. They may be square (that's the easiest to cut) or triangular and rounded on the corners. This is my favourite, though I prefer elongated triangles personally, like those you can see in the pictures above. If you are not inspired to design your own shape, you can use the measurement from the picture below to trace them onto your leather.

Once we have chosen the style and colour, and also decided if it is going to be made of genuine leather (I buy mine from a remnant basket, and one such piece is usually more than enough) or faux leather (a cheaper option, but perhaps not as durable), we can copy the shape of the pads onto the wrong side of the leather. Faux leather works with pencil and colour pencils, but for genuine leather you will need to use a pen. Make sure you are ON THE WRONG side. You can also draw the pads directly on the piece of leather. I traced my triangles using the dressmaking copying paper and traced them the same way as I do with fabric.

I like to use best the space and use up all the leather, so I copy the pattern pieces very close to each other. This also saves time and work when cutting them out.

Once we are ready, and we have enough pieces (just make sure you have drawn a few extra pieces in case anything goes wrong while cutting), we can start with the rotary cutter. It is very useful as it cuts well through any leather (and also your skin...). To finish, we can use a smaller cutter or very sharp scissors. These will not work, though, with thick leather, but on the other hand, will be great for faux leather.


Now we will need the straps. It is really up to you how long they will be. Make sure you take into account the size of the toggles or buttons you are going to use, as sometimes extra length is needed. I will use 11 cm - 4 3/8" long straps. Cut your leather strap into even pieces. You can also make them from leather, for better matching. These should be wide enough to prove strong, but thin enough to go through the holes of your buttons! I used 4 mm - 3/16" wide straps.

 |
| I made the straps for the off-white colour closures and bought a leather thread of 3 mm wide for the black ones. |
The next step is to glue the straps to the pieces of leather. This is temporary, so you do not need to use a very strong glue. Glue gun is OK as long as you use just a tiny bit of it, as it may create bulk you do not want. If you are using super glue, make sure you apply just a bit, and towards the center of the pad, as it hardens and you still need to sew the closure to your coat. The best is of course a special glue for leather. Then I use pegs to make sure they are pressed well and long enough. Remember to thread the buttons BEFORE gluing, and also, make sure they are all facing the same way.

Make sure you have made one the same number of loops as you have buttons. Now we are ready to sew them onto the coat. My advice is to glue the closures temporarily to the wool - otherwise who know how they will end up. Here, machine-sewing is as good as hand-sewing. If your closures are made of genuine leather, it is advisable to make holes beforehand for hand stitching. If you are machine-sewing them, remember to set the stitch length to 3, for example, as to short stitch will make the closure prone to breaking. I use special needles for leather, which I do recommend.

Et voilà!
Thursday 3 November 2016
Boot buttons
Nowadays, most footwear is designed to fasten with Velcros, zippers and snaps, some have shoelaces, and some even have parts made of elastic to minimize the fuss with fastening and unfastening. But in the olden days, especially women's boots had a row tiny buttons on metal loop shanks. They were popular until 1940s, when other closure systems became more widespread.
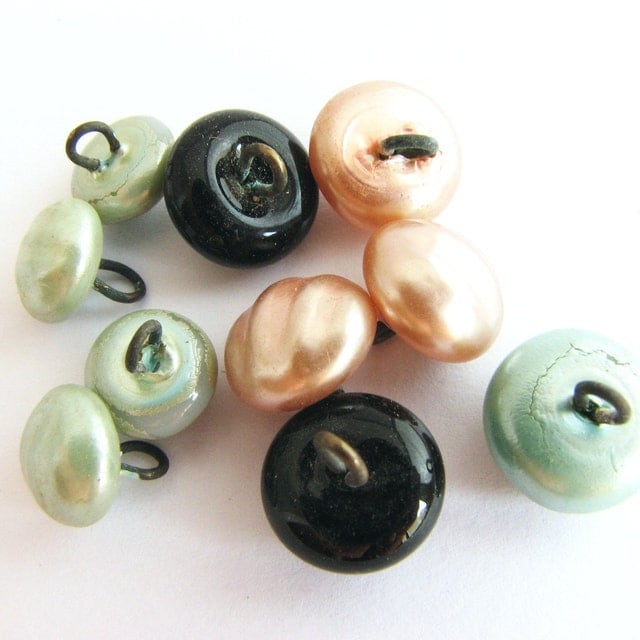
The boot buttons above are quite a luxury compared to most of the kind, made of glass and painted in beautiful colours, like mint green or pale pink. Most boot buttons, however, were made of enameled metal, and the colours were far less exciting.


The last few of the boot buttons here are made of lucite plastic and metal. Really small pieces. No wonder women took a long time to get ready, when they had to fasten all the buttons up the calf, even if they had ankle boots. Nonetheless, in mid-19th century, someone has come up with a very clever idea how to speed up the process and a button hook was conceived.
As you can see, the buttonhooks came in all possible shapes and sizes, with the handle made of various materials. The collection above, from Bedford Museum, shows hooks with wooden and bone handles. I can also see some antler handles here, and below, a few luxury silver ones.
Button hooks were so ubiquitous that some companies used to give them out for free as a form of promotion, with the brand name of the company engraved on the handle. I guess these were really useful! You can read more about the history of this unusual invention on this website dedicated to buttonhook collecting.
Nowadays, boot buttons, if they are sewn to boots and not glued, are usually only for decoration, with an alternative, more practical closure concealed somewhere else.
The boot buttons above are quite a luxury compared to most of the kind, made of glass and painted in beautiful colours, like mint green or pale pink. Most boot buttons, however, were made of enameled metal, and the colours were far less exciting.


The last few of the boot buttons here are made of lucite plastic and metal. Really small pieces. No wonder women took a long time to get ready, when they had to fasten all the buttons up the calf, even if they had ankle boots. Nonetheless, in mid-19th century, someone has come up with a very clever idea how to speed up the process and a button hook was conceived.
 |
| The button hooks were useful also for waistcoats and gloves, which usually had planty of tiny buttons. |
As you can see, the buttonhooks came in all possible shapes and sizes, with the handle made of various materials. The collection above, from Bedford Museum, shows hooks with wooden and bone handles. I can also see some antler handles here, and below, a few luxury silver ones.
Button hooks were so ubiquitous that some companies used to give them out for free as a form of promotion, with the brand name of the company engraved on the handle. I guess these were really useful! You can read more about the history of this unusual invention on this website dedicated to buttonhook collecting.
Nowadays, boot buttons, if they are sewn to boots and not glued, are usually only for decoration, with an alternative, more practical closure concealed somewhere else.
 |
| These boots are no longer for sale but you can find plenty more on etsy! |
Tuesday 11 October 2016
Button stamps
Dear all,
Until recently, I used to buy the button stamps for envelope decor on Etsy, from other sellers - something very practical and time saving. But then I asked my stamp provider if she could carve one specially for me. She said she was very busy and could not carve any custom stamps....

That's when I decided to try my hand at stamp carving. I bought a set of 3 tools (very cheap in TIGER store full of craft ideas), which were good for the beginning, but not as good for carving lines, so I had to order an extra tool online. I also purchased some rubber for carving. And then sat down and started playing with my new toys :)

The first button carved in rubber was not as impressive as I expected, but I guess it is normal. I had to learn how to handle the tools and I did not know how deep I should carve at first. But with some practice I managed to improve my skill and carved some more pieces.
All in all, carving rubber stamp is not that difficult. I had a lot of fun doing it and I think I will continue as long as I have the inspiration from my vintage buttons :)
Rubber stamps provide just one possible idea how to decorate envelopes with orders. Do you have another favourite way of doing it?
Until recently, I used to buy the button stamps for envelope decor on Etsy, from other sellers - something very practical and time saving. But then I asked my stamp provider if she could carve one specially for me. She said she was very busy and could not carve any custom stamps....

That's when I decided to try my hand at stamp carving. I bought a set of 3 tools (very cheap in TIGER store full of craft ideas), which were good for the beginning, but not as good for carving lines, so I had to order an extra tool online. I also purchased some rubber for carving. And then sat down and started playing with my new toys :)
 |
| I used my own vintage buttons designs |

The first button carved in rubber was not as impressive as I expected, but I guess it is normal. I had to learn how to handle the tools and I did not know how deep I should carve at first. But with some practice I managed to improve my skill and carved some more pieces.
 |
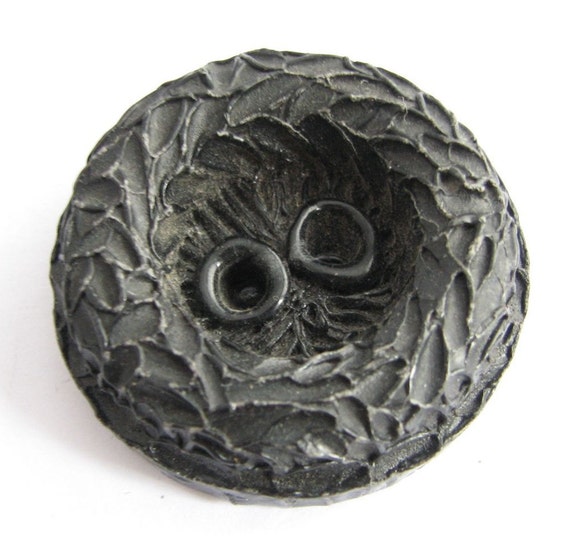
| It was this small button you can see at the bottom here that first inspired me to carve. |
 |
| This is how my envelopes look now :) Do you recognize that black button? |
Rubber stamps provide just one possible idea how to decorate envelopes with orders. Do you have another favourite way of doing it?
Friday 7 October 2016
Celluloid - the indispensabe spy's equipment
Celluloid buttons were the very first I could identify among my buttons. I could clearly see they were unlike the other buttons. And I was not wrong. But first I have to explain myself why I used this unlikely title for this post. Celluloid sheets formed part of basic spy tools: as it is a highly inflammable material, these sheets helped them destroy classified information before it reached the hands of the enemy. During cold war it must have been something very common (I mean both destroying and acquiring classified information). Nowadays spying is more about hacking, so more silicon than celluloid is used in the industry. So let's get back to the buttons.
Another thing is its weight. Celluloid buttons are much lighter than acrylic or casein buttons. And you can actually perceive this difference just by taking it in your hand. No scales needed. This is an advantage when considering using large buttons in a sewing project. Also, you can identify them easily wth no need of extra paraphernalia, like when testing for bakelite, even outdoors in a street market.
Never use hot needle for testing celluloid! While this method may leave a horrible mark on most other materials, celluloid may burn spontaneously. Better take the table tennis lesson.
Also, celluloid is very brittle. It is easy to break, crack and chip. Sometimes this characteristic was even taken into account in the button design, so it would have a rough finish:
Because they are so easy to break and crack, they should not be stored together in a bag. When sending them overseas, I usually wrap them generously in bubble wrap, so that they do not touch one another. I would aso recommend removing them from a garment if you are planning to wash it in high temperatures, or before leaving it at dry cleaner's. If you have some really nice pieces sewn to your favourite dress or blazer, chances are they will get broken in the process. And never ever use a hot iron when the buttons are still sewn to a garment, also for your own safety. The same for dry cleaner's: they don't check all clothes, just press them as they are with the same industrial stuff. You may lose the buttons, and the drycleaner's shop along with them.
 |
| A range of celluloid buttons from my original collection. Some have already sold out. |
Celluloid
- was the very first thermoplastic in history. It is actually made of cellulose, although mixed and exposed to other substances. It was invented as early as mid-nineteenth century, but it was most commonly used for button production between 1930s and 1950s. Other uses were, for example, in photography and movie films, toys, like dolls; table tennis balls and the already mentioned celluloid sheets used to destroy secret notes. |
| Celluloid buttons can preserve the dye really well. Look at these 1950s buttons. Some 1980s plastic buttons may have faded, but not these. |
How to identify celluloid
The most remarkable thing about celluloid buttons is the sound they make against each other. If you have ever played table tennis, you will identify it easily. If not, maybe you could try it? It is a valuable lesson.Another thing is its weight. Celluloid buttons are much lighter than acrylic or casein buttons. And you can actually perceive this difference just by taking it in your hand. No scales needed. This is an advantage when considering using large buttons in a sewing project. Also, you can identify them easily wth no need of extra paraphernalia, like when testing for bakelite, even outdoors in a street market.
Never use hot needle for testing celluloid! While this method may leave a horrible mark on most other materials, celluloid may burn spontaneously. Better take the table tennis lesson.
Also, celluloid is very brittle. It is easy to break, crack and chip. Sometimes this characteristic was even taken into account in the button design, so it would have a rough finish:
 |
| This celluloid button was designed in a way that any cracks will just add it extra roughness. This one is unused, so it looks perfect. |
 |
| Unfortunately, not all buttons are designed this way. If you see the image in full size, you will notice the cracks :( |
How to handle celluloid
It is very important to remember, that this material is highly inflammable. Not only does it catch fire instantly, completely destroying the piece, but also, it may go on fire when exposed to high temperatures (for example, keep them away from hot iron or oven).Because they are so easy to break and crack, they should not be stored together in a bag. When sending them overseas, I usually wrap them generously in bubble wrap, so that they do not touch one another. I would aso recommend removing them from a garment if you are planning to wash it in high temperatures, or before leaving it at dry cleaner's. If you have some really nice pieces sewn to your favourite dress or blazer, chances are they will get broken in the process. And never ever use a hot iron when the buttons are still sewn to a garment, also for your own safety. The same for dry cleaner's: they don't check all clothes, just press them as they are with the same industrial stuff. You may lose the buttons, and the drycleaner's shop along with them.
 |
| Plain caramel brown buttons, made of celluloid, on a vintage button card. These could be used in a coat, but remember to remove them before washing or leaving at dry cleaner's! |
Thursday 29 September 2016
How to open a successful shop on Etsy
I am aware this is not the first nor the last post on the Internet to explain how to do business on Etsy. Actually, I don't think one post would be enough to answer this question properly. Nevertheless, I will try to explain some basics, in order to help anyone wishing to start a successful business on their own or simply looking for advice on how to improve. This is especially valuable to anyone who thinks they have good skill or interesting items to sell, but can't find a buyer locally. Etsy is a worldwide exhibition window and only you can put limits to it. Jobs in Spain are scarce these days, and Etsy can make you a living.
Today, 3 years on and more than a thousand sales after I ventured on this project, I have 2 shops and lots of stock to post. I have hundreds of satisfied customers and all-stars reviews, which I am really proud of.
As you may have read in my initial post about how I found the buttons, I started from scratch and was ready to spend €5 on my business. Later I learnt that if you get invited to open a shop, you can start for free. Well, €5 was not such a big sum and I must say I recovered it quite quikly, but if you do not want to risk even that little, click HERE (if the link does not work properly, email me).
First of all, before you decide to bother yourself and waste time on opening an on-line buiness, it is advisable to a market research into similar items on etsy. Are there many people selling the same thing? Does this thing actually sell? Does it have any special added value? What kind of customers may be interested in it?
If something doesn't exist on etsy,chances are, you have misspelled it. Otherwise, which would be very unlikely, you would have to assume that nobody sells anything like it, which could mean that IT DOESN'T SELL: But, as I said, this would be really strange. (You wouldn't believe what sort of stuff people sell on line...)
If there are too many websites selling similar items, think of the added value, or uniqueness of your products. There are lots of shops selling handmade jewellery, but not too many sell jewellery made of natural materials like seeds. There are lots of buttons out there, but not too many which are larger than 40 mm, and the bigger, the more sought after!
Also, you can see how the prices range among the competition. You shouldn't, of course, make your product way cheaper, because people may suspect it is worse quality. But if you are the most expensive, people will prefer to buy from someone else.
It is a good idea to find a role model among shops selling similar items, one that you would like to become, say, in two years' time. It is really motivating and makes it easier to establish short-term and long-term goals.
Remember taht shops with just a few items will not get many visits. Or no visits at all.
While Etsy keeps repeating this all the time, giving you lots of tips, you may want to get some basics. If you are a professional photographer, you know what to do without advice. But if you are an amatuer, just like me, you will see that it takes time to learn the skill. However, in one of my previous posts I wrote a short guide for anyone who wants to take good product pictures for selling purposes.
If you follow this advice, I am sure you will be able to attract customers with your photographs.
This is the most important part of SEO on Etsy. You must make it clear what your product is here, and also match the search terms you potential customers may use. To do this, you could do a research by looking for similar items on Etsy. This way you will see what search terms you yourself are using - write these down - plus, you can get an idea from the top results of how to write a successful title.
Use 3-4 word phrases, including the main keyword in each. For example:
Black leather handbag, natural leather purse, large shoulder bag
Ideally, these should be joined into longer phrases, which will make them sound more naturally, like:
Black leather handbag with long shoulder strap
Make sure you use the most important keywords at the beginning. To find out what is most sought, you can use google keyword tool. Remember to use all the synonyms here, as well as in the product description.
Also, words like "beautiful", "amazing" and "pretty" will not work. Not only because beauty is in the eye of the beholder, but simply because, nobody uses these terms to search for anything. Have you youself ever looked for anything by typing 'beautiful'?
This part should also start with a short description, more sentence-like, of your product. The first words are the most important. I initially made the mistake of writing: 'A lot including 7 large green buttons' at first, missing the hits for buttons. And few people look for 'a lot including'. Now I usually start with something like 'Extra large buttons' or '7 blue buttons', or 'a buttton card with'
Do not make your description too long. I doubt whether many people would read more than a few lines of it anyway. Make sure you have enlisted the most important features. I use a list, like the one below (this one is from a buckle description):
Do not include all the shipping options and shop policies here. These have a specific space on your shop page. Also, if you want, you can pinpoint the most important questions in FAQ, which will be displayed right below the description, also on mobile devices.
You can also add information about the manufacturing process, care, or even the item's history if it is a vintage object. These are usually interesting to read. But do not ramble on length.
Mind, that on mobile devices, and that includes tablets too, the item description is not displayed at first sight. And few people click on "more info" (they even prefer to send a convo with a question about something they could easily read there). So, if you have some important characretistics, for example in my case, the button size, add this in 'Variations', even if there is only one size available. This will add an extra line in the details column, visible also on mobile devices. I started doing that when more and more people suddenly started asking me a lot of questions about the dimensions, although the information was already provided in product descriptions. I soon changed all listings to include this extra line of information, and guess what? I don't get these questions anymore.
These are for sheer SEO purposes, so make sure you do not add too many descriptive words which are not used but potential buyers. But... how to know what is used in search?
Avoid tags like 'round buttons'. Obviously, some buttons are round, but if you someone is looking for buttons, they will just write 'buttons', unless they specifically want triangular or square ones. I did that at the beginning too, as I didn't know how to use up all the 13 tags.
One of the most important things I have learnt about the tags is that you should use two or three words instead of just one for every one of them. At the beginning I did not know that and used tags like:
Believe me, hardly anyone visited my shop. And then I dug the Etsy blogs and in an old discussion post some suggested this to someone else. I decided to try it and BOOM! My stats sky-rocketed! Now I usually use:
It doesn't matter if you repeat the key word several times. Google may not like it, but it will help you gain visibility on Etsy. It is important that you understand that Etsy and Google SEO do not work the same way. It is really great to be found on Google, but even more important to get found on Etsy.
We may not judge a book by its cover but we certainly measure the professionalism by the image a shop gives. This is why you should upload a shop logo, a background picture and a banner (I use this one for packaging slip). Ideally all of them in coordinating colous and themes. Your picture is also a sign that you are a professional - but also a human. No scam. You can use other professionals to help you out. There are thousands of designers on Etsy, specialised in Shop logos and banners. You can also have a go and try to make it yourself.
Don't worry about the background picture - you can improve it later. To start with, you can use a picture of your range, for example, clothes on pegs, I used to have a picture of several button cards, simply cropped into the measurements that Etsy required.
I was lucky, because my sister, who sometimes does graphic design, and also calligraphy, designed a logo for me. With it, I created a nice background composition, using my items.
I use free software for that, like IrfanView and Inkscape. At some point I even used MS PowerPoint to put together some compositions.
Make sure you select a few nice items as featured listings, which will appear at the top of your shop. This will draw people's attention to them and plus, it will add 4 more items to your first page, which is especially important if you do not have too many items.
It is definitely a bad idea to add all your items the very first day and then just sit down and wait what happens. The Internet loves fresh content and it is insatiable. So it is best to keep feeding it regularly, but little by little. Later on you will have to renew the listings (they only live on Etsy for 4 months). This will give them new life, and it is also a good moment to revise them and change a part of the title or tags to something that works better.
New and renewed items also pop up on your fans' main sites. So do the Updates, which are pictures you can upload from the mobile Sell on Etsy App. These are also a good idea to bring your buttons to potential buyers, but you will have to install an app on your mobile or tablet. While it is convenient to have it on a device with a camera, it is best to upload quality pictures, taken with a normal camera, as they will be displayed also on computer screens.
Today, 3 years on and more than a thousand sales after I ventured on this project, I have 2 shops and lots of stock to post. I have hundreds of satisfied customers and all-stars reviews, which I am really proud of.
 |
| This is the current look of my original shop on etsy. |
As you may have read in my initial post about how I found the buttons, I started from scratch and was ready to spend €5 on my business. Later I learnt that if you get invited to open a shop, you can start for free. Well, €5 was not such a big sum and I must say I recovered it quite quikly, but if you do not want to risk even that little, click HERE (if the link does not work properly, email me).
Know your competition
First of all, before you decide to bother yourself and waste time on opening an on-line buiness, it is advisable to a market research into similar items on etsy. Are there many people selling the same thing? Does this thing actually sell? Does it have any special added value? What kind of customers may be interested in it?
If something doesn't exist on etsy,chances are, you have misspelled it. Otherwise, which would be very unlikely, you would have to assume that nobody sells anything like it, which could mean that IT DOESN'T SELL: But, as I said, this would be really strange. (You wouldn't believe what sort of stuff people sell on line...)
If there are too many websites selling similar items, think of the added value, or uniqueness of your products. There are lots of shops selling handmade jewellery, but not too many sell jewellery made of natural materials like seeds. There are lots of buttons out there, but not too many which are larger than 40 mm, and the bigger, the more sought after!
Also, you can see how the prices range among the competition. You shouldn't, of course, make your product way cheaper, because people may suspect it is worse quality. But if you are the most expensive, people will prefer to buy from someone else.
It is a good idea to find a role model among shops selling similar items, one that you would like to become, say, in two years' time. It is really motivating and makes it easier to establish short-term and long-term goals.
Stock up your shop
Once you have opened the shop, you must fill it with stock! Use all the free listings, or at least 30 to begin with. If you think you do not have enough range to post 30, think of something easy to make or post and make lots of colours (like these peter pan collars), or post the same item twice if you have two, using different photos and descriptions. Also, this will give you insight to what is more attractive, which description works better etc.Remember taht shops with just a few items will not get many visits. Or no visits at all.
Make photography your priority
While Etsy keeps repeating this all the time, giving you lots of tips, you may want to get some basics. If you are a professional photographer, you know what to do without advice. But if you are an amatuer, just like me, you will see that it takes time to learn the skill. However, in one of my previous posts I wrote a short guide for anyone who wants to take good product pictures for selling purposes.
If you follow this advice, I am sure you will be able to attract customers with your photographs.
Product titles are key
This is the most important part of SEO on Etsy. You must make it clear what your product is here, and also match the search terms you potential customers may use. To do this, you could do a research by looking for similar items on Etsy. This way you will see what search terms you yourself are using - write these down - plus, you can get an idea from the top results of how to write a successful title.
Use 3-4 word phrases, including the main keyword in each. For example:
Black leather handbag, natural leather purse, large shoulder bag
Ideally, these should be joined into longer phrases, which will make them sound more naturally, like:
Black leather handbag with long shoulder strap
Make sure you use the most important keywords at the beginning. To find out what is most sought, you can use google keyword tool. Remember to use all the synonyms here, as well as in the product description.
Also, words like "beautiful", "amazing" and "pretty" will not work. Not only because beauty is in the eye of the beholder, but simply because, nobody uses these terms to search for anything. Have you youself ever looked for anything by typing 'beautiful'?
Product descriptions
This part should also start with a short description, more sentence-like, of your product. The first words are the most important. I initially made the mistake of writing: 'A lot including 7 large green buttons' at first, missing the hits for buttons. And few people look for 'a lot including'. Now I usually start with something like 'Extra large buttons' or '7 blue buttons', or 'a buttton card with'
Do not make your description too long. I doubt whether many people would read more than a few lines of it anyway. Make sure you have enlisted the most important features. I use a list, like the one below (this one is from a buckle description):
colour: dark brown
diameter: 90 mm / 3 9/16"
Suitable for 54 mm / 2 1/16" belts
Do not include all the shipping options and shop policies here. These have a specific space on your shop page. Also, if you want, you can pinpoint the most important questions in FAQ, which will be displayed right below the description, also on mobile devices.
You can also add information about the manufacturing process, care, or even the item's history if it is a vintage object. These are usually interesting to read. But do not ramble on length.
Mind, that on mobile devices, and that includes tablets too, the item description is not displayed at first sight. And few people click on "more info" (they even prefer to send a convo with a question about something they could easily read there). So, if you have some important characretistics, for example in my case, the button size, add this in 'Variations', even if there is only one size available. This will add an extra line in the details column, visible also on mobile devices. I started doing that when more and more people suddenly started asking me a lot of questions about the dimensions, although the information was already provided in product descriptions. I soon changed all listings to include this extra line of information, and guess what? I don't get these questions anymore.
Tags or Search Terms
These are for sheer SEO purposes, so make sure you do not add too many descriptive words which are not used but potential buyers. But... how to know what is used in search?
- One way to do it is to go to Stats and check all the most popular search ter
- ms over a time, and use these or similar. But you can only do that after your shop has been running for, say, a month in the very least.
- Another way is to use the google keyword tool to get some real numbers.
- Again, you may imaginne you are looking for this item and see what you use.
- Go to the 'Search for items or shops' field and introduce one word, for eample 'buttons' and one space. Etsy will automatically give you some hints on what you may be looking for. These are popular search terms.
- Don't be afraid to experiment. A good idea is to use one completely unique tag out of 13 which will be unlike anything else. For example, I used klingon style for one of the buttons. Now guess what? Somebody actually used it and clicked on the buttons. You may discover a whole world of strange search terms that people use!
 |
| If you choose the right category for your product, this will add some valuable tags to your list. Look at the first four keywords, with capital letters. These were added automatically, and they are really strong. |
Avoid tags like 'round buttons'. Obviously, some buttons are round, but if you someone is looking for buttons, they will just write 'buttons', unless they specifically want triangular or square ones. I did that at the beginning too, as I didn't know how to use up all the 13 tags.
One of the most important things I have learnt about the tags is that you should use two or three words instead of just one for every one of them. At the beginning I did not know that and used tags like:
'button', 'black', 'large', 'flower' etc.
Believe me, hardly anyone visited my shop. And then I dug the Etsy blogs and in an old discussion post some suggested this to someone else. I decided to try it and BOOM! My stats sky-rocketed! Now I usually use:
'black buttons', 'large buttons', 'flower buttons', etc.
It doesn't matter if you repeat the key word several times. Google may not like it, but it will help you gain visibility on Etsy. It is important that you understand that Etsy and Google SEO do not work the same way. It is really great to be found on Google, but even more important to get found on Etsy.
Your appearance shows you are a professional
We may not judge a book by its cover but we certainly measure the professionalism by the image a shop gives. This is why you should upload a shop logo, a background picture and a banner (I use this one for packaging slip). Ideally all of them in coordinating colous and themes. Your picture is also a sign that you are a professional - but also a human. No scam. You can use other professionals to help you out. There are thousands of designers on Etsy, specialised in Shop logos and banners. You can also have a go and try to make it yourself.
Don't worry about the background picture - you can improve it later. To start with, you can use a picture of your range, for example, clothes on pegs, I used to have a picture of several button cards, simply cropped into the measurements that Etsy required.
I was lucky, because my sister, who sometimes does graphic design, and also calligraphy, designed a logo for me. With it, I created a nice background composition, using my items.
 |
| This is the background photo of my newer shop. I used the same logo for branding purposes. |
I use free software for that, like IrfanView and Inkscape. At some point I even used MS PowerPoint to put together some compositions.
Make sure you select a few nice items as featured listings, which will appear at the top of your shop. This will draw people's attention to them and plus, it will add 4 more items to your first page, which is especially important if you do not have too many items.
Add new items regularly
It is definitely a bad idea to add all your items the very first day and then just sit down and wait what happens. The Internet loves fresh content and it is insatiable. So it is best to keep feeding it regularly, but little by little. Later on you will have to renew the listings (they only live on Etsy for 4 months). This will give them new life, and it is also a good moment to revise them and change a part of the title or tags to something that works better.
New and renewed items also pop up on your fans' main sites. So do the Updates, which are pictures you can upload from the mobile Sell on Etsy App. These are also a good idea to bring your buttons to potential buyers, but you will have to install an app on your mobile or tablet. While it is convenient to have it on a device with a camera, it is best to upload quality pictures, taken with a normal camera, as they will be displayed also on computer screens.
 |
| Etsy shop updates are best when they include a picture of an item during the production process or a finished product in use, rather than just a repeated detail picture, although sometimes it is not a bad idea to post a close-up photo which is not the main product picture. |
* * * * *
I hope you have enjoyed reading this post and even more, you found it helpful. Making mistakes is normal. Learning from them is intelligent. And if you can, avoid them by reading posts like this one.
Don't forget about social media, the word of mouth and some good old business cards to promote your shop. Well, how to promote the hop after it has been opened could fill one or more new posts...
Good luck!
Monday 29 August 2016
Casein - An Early Plastic
As I was cleaning my first group of buttons, I started discovering different materials. At the beginning I expected all the buttons to be simply made of plastic. I had no idea they could be any different. Of course, I could tell some were made of metal or mother of pearl, but the rest was just plastic to me.
But then, some buttons looked different. They were lighter or made a different sound when put together in a bag. Some others had uneven surface on the back. I started researching and I learnt that there are lots of other materials in the plastic family, actually, most are early kinds of plastic, which have different properties. And thanks to this information, it is also easier to date the items as made in different decades of the 20th century.
Another way of checking what the buttons are made of is by rubbing them vigorously. The smell is similar to when dampened, but not all casein buttons will pass this test. I personally have some buttons, which did not smell unless dampened.
There are beautiful marbled versions of casein, but also plain colours. I have embossed buttons and carved ones, small and extra large, flat and shank buttons, and some casein buckles as well.
Apparently, however, casein buttons can withstand dry cleaning and ironing. The question is how much you trust your dry cleaner to follow the right procedure. There is still a risk that casein buckles or buttons may be mechanically damaged during dry cleaning. It is recommendable thus that you wrap them previously in something soft to protect against any chipping or braking. This should be done by the dry cleaner's, but I do not know any business around that does it.
If you want to see more casein buttons, just click HERE.
 |
| These buttons smelled suspicious to me... |
But then, some buttons looked different. They were lighter or made a different sound when put together in a bag. Some others had uneven surface on the back. I started researching and I learnt that there are lots of other materials in the plastic family, actually, most are early kinds of plastic, which have different properties. And thanks to this information, it is also easier to date the items as made in different decades of the 20th century.
CASEIN, or galaltih
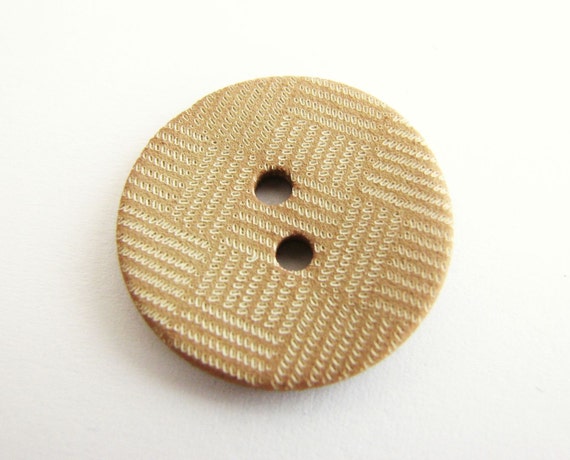
is an early plastic, made of milk protein. Something organic and natural turned into plastic. Unfortunately not very durable. It was very popular from 1930s to 1950s, when it was replaced by more durable acrylic plastic. In Spain, casein buttons could be found even in 1960s, as the imposed embargo on foreign products made it difficult for the new technologies to get there initially.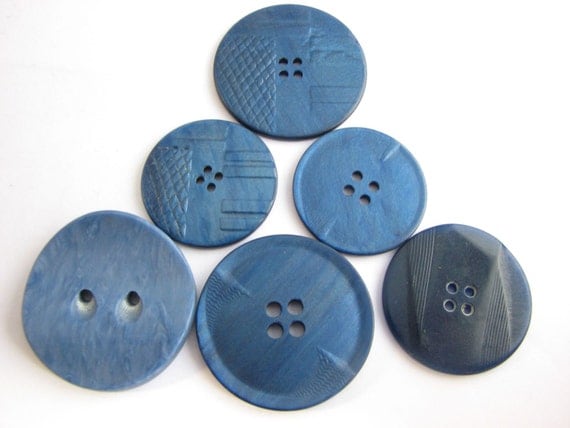 |
| A lot with casein buttons. These have embossed art deco pattern. |
How to tell whether it is casein or not
To determine whether a button is made of casein, I use a damp cloth on it, leaving a bit of water to dry on the surface. While it is still a bit humid, I smell it. It usually gives out the scent of cured cheese, something very common in Spain. While smelling buttons are not the most pleasant thing in the world, I can assure you that when dry, these buttons look almost as if made of modern conventional plastic.Another way of checking what the buttons are made of is by rubbing them vigorously. The smell is similar to when dampened, but not all casein buttons will pass this test. I personally have some buttons, which did not smell unless dampened.
There are beautiful marbled versions of casein, but also plain colours. I have embossed buttons and carved ones, small and extra large, flat and shank buttons, and some casein buckles as well.
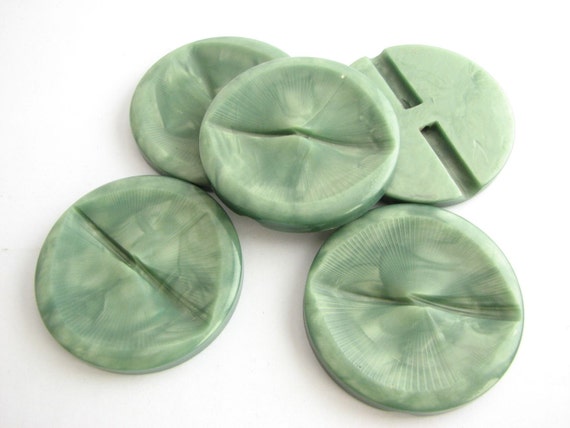 |
| Extra large buttons made of marbled casein. These are embossed rather than carved. These are from 1950s-1960s. |
 |
| A vintage buckle made of 3 layers of casein, plain colour and with carved details. Fantastic example from art deco era! |
How to handle casein items
Casein is extremely vulnerable to temperature and humidity. It should not be machine washed. Remember the old habit of removing buttons before washing a coat or a jacket? I guess it all made sense, taking into account that casein could easily be dissolved in water at a temperature higher than 50º C. Exposing it to water at whatever temperature is not a good idea either. A bit of damp cloth hasn't done any harm to them, not a quick rinse, but I would be extremely cautious when exposing it to water for any longer. |
| Click to see the picture in original size and you will see the cracked surface. These casein buttons have been machine washed. |
If you want to see more casein buttons, just click HERE.
Tuesday 19 July 2016
How to take good product photos
...and without photoshop!
Hi everybody!

Since I started my button adventure, my photogrphic skills have improved significantly. At first I had little idea of how to take attractive pictures and they would look like this:
No wonder my shop was not very popular! I knew I had to use white background, but it would never turn out white in the pictures! I was desperate. I also hated the shadows, whch were a problem every time the button was not flat.
There are a few tricks I have learnt since then that I would like to share with you. I am a 100% amateur and believe me, you do not need to be a professional photographer to take and post good pictures.

Well, I hope you have enjoyed reading this post!
Hi everybody!

Since I started my button adventure, my photogrphic skills have improved significantly. At first I had little idea of how to take attractive pictures and they would look like this:
 |
| Surprisingly, these have sold, despite the poor image quality |
No wonder my shop was not very popular! I knew I had to use white background, but it would never turn out white in the pictures! I was desperate. I also hated the shadows, whch were a problem every time the button was not flat.
There are a few tricks I have learnt since then that I would like to share with you. I am a 100% amateur and believe me, you do not need to be a professional photographer to take and post good pictures.
- To start with, never use the automatic mode in your camera! It is designed to capture the largest size image with the poorest quality. And you can't fix it later! I usually go for the semi automatic, which allows me to choose several options, but still does the 'difficult stuff', like focus, automatically.
- Overexposure helps 'bleach' the background so that it is whiter. I usually go for +1 or +1 1/3, depending on the light. However, I don't do this if I am photographing white items against black background, as in this case, the details will be 'bleached' and so, invisible.
- To be able to take pictures without shadows, or the least possible, I made this photo box out of an empty cardboard box.
 |
| You can see my sewing machine in the background :) |
I cut out the sides, leaving a narrow piece every time and pasted some tissue paper from the inside. There is also a background made of white paperboard and a white sheet of paper, which I change from time to time, as it gets dirty (that's where I place the buttons). Well, every few months really. But I like it to be snow white.

- Now there is an issue with the focus. I use auto-focus, but I love taking pictures very close up. It is great to show the tiniest details of the buttons. I am lucky because my camera, apart from the typical macro mode has supermacro, which allows taking good pictures from no distance at all (I can virtually put something on the objective and it will still capture it focused!)
 |
| The tiny carvings on this nacre button are invisible to the naked eye - they look like simple lines. |
- White balance - another key word. If you do not know what it is: it establishes what the white colour is, basing on the light you are using. Lamps usually have a bit yellow light, so it adjusts the settings so that white is still white. If, on the contrary, you use the light bulb mode in day light, your pictures will be blue (like mine...)
| Different icons used in your camera for white balance. Do not use auto balance! Sunny day mode is good if you are not using a photo box. Cloudy is still not good for it, so I usually pre-establish the white (the icon in the middle of the bottom row). Shady place (the last icon) is also great, but I don't have that one in my camera! And there is the K mode, which I would not dare to use. It basically allows you to introduce whatever value manually. One day I am sure I will master it... |
- Natural day light is crucial. I have tried to take pictures using lamps and adjusting the white balance accordingly, but it's no use. They will have extra shadows and extra light just where you would like not to have any! So I usually take the pictures on sunny days, close to the window.
- OK, we've got a picture which is taken with the right focus, at a right angle, no shadows, but white is not white! It is grey! Don't panic. You can make the most of your picture even so. I am using a freeware program, really small and really easy, to fix any imperfections. Also, sometimes there are microscopic fibres or other nano-stuff that you can't see with a naked eye, but the camera can. And this program allows you to correct this too. It is called IrfanView and its many options. The basic function I use is Image>Color Corrections or Shift+G. Here you can slightly change the tone of the picture to correct the white balance. I also add some contrast. the buttons look so much better!

 |
The pictures above are actually the same photo but one is the originally taken (the blue one, of course) and the other one has been changed in IrfanView. Still not perfect, but so much better! By the way, in IrfanView you can crop the image you want, you can also rotate it, even very slightly, and so on, and so forth. So if you do not want to study the science of photoshop, go to http://www.irfanview.com/ and download a version of this freeware program.
- Although I am in favour of white background, because this is the best way to see the product and not get distracted, I occasionally use different colour backgrounds just to make my online shop look more attractive, or when I am taking pictures of white and off-white items, in which case I usually go for black background. I usually use fabric, but sometimes also colourful paperboard for this purpose.

- My last tip is to take a few different pictures and at different angles. I hate looking at stuff in other shops, where there are seemingly 5 pictures, but all of them are the same!! I usually take a picture from the top, then at an angle, the back of the item (which may help people see what it is made of) and one with an SD card, which helps understand the real size of the buttons. I know everybody uses coins for that purpose, but hey, the Internet is a global market, and in every country there are different coins! If I post a 1 Euro coin, folks in the US won't know how big in comparison it is. And If I use an American coin, who in Japan will know its size? SD cards, on the other hand, are the same everywhere.
 |
| One picture, at least, has to give an idea of what the item actually is. In this case, no doubt, we can see 6 shank buttons. |
If your product has got interesting details, show them off! I sometimes use the detail photo as the main picture of the item. And every time I am more convinced that it is what attracts more visits to the shop, whether they want to see what the whole product is like, or simply because the details are adorable.
Oh, one more. Do not overdo on photo size. I use a quite small size of the pictures, 1600 x 1200. It's enough for most computers and it uploads in a flash.
Well, I hope you have enjoyed reading this post!
Wednesday 22 June 2016
How to take a prong off a buckle
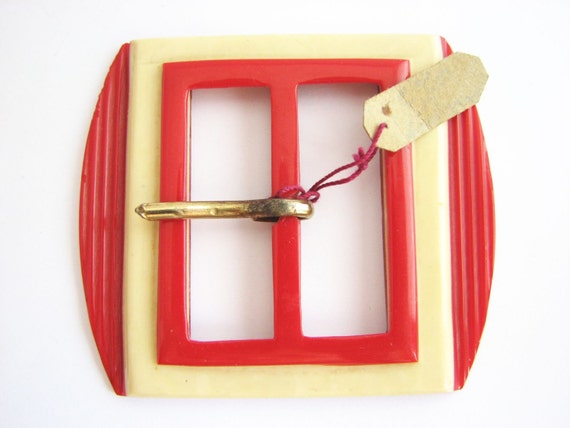
Most belt buckles come with a metal prong. While some antique buckles may have casein prongs, which are impossible to remove without breaking the piece, the prongs on most modern buckles are easy to remove. In my shops I do it as a standard service, but if you have bought one WITH a prong and now you have changed your mind, don't worry. It is easy to fix.
You can do it in two different ways. Sometimes one way is better than the other.


The first technique requires a screwdriver. It has to be a small one, like a jeweller's screwdriver. Insert the tip into the space where the metal prong bends over and closes. Use the screwdriver as leverage to lift it open. Or simply turn it and it will open easily. This method is best for small buckles with thin center bar.
Look at the picture below, which explains where to insert the tip:

The other way involves using pliers, but again, you will need very small, jeweller's pliers. Otherwise you may scratch the buckle, if not destroy the brittle piece completely.
Insert one end where the prong closes around the central bar. Hold the other end of the prong. Bend it open until you can see there is enough space for the bar.
Here are a few pictures to illustrate the process.

If your buckle is big and chunky, or the central bar very thick, you should go for the pliers, as the screwdriver may not be enough. On the contrary, if the prong is closed very tightly around the central bar, you will rather need a screwdriver. Also, you can combine both methods, and begin with the screwdriver and finish with the pliers.
Also, I recommend you keep the prong. You never know, maybe one day you get a belt buckle which you really like, but without a prong. You will have a perfect one to fit!
 |
| These yellow buckles originally had a metal prong but the customer requested to have them removed. |
You can do it in two different ways. Sometimes one way is better than the other.


The first technique requires a screwdriver. It has to be a small one, like a jeweller's screwdriver. Insert the tip into the space where the metal prong bends over and closes. Use the screwdriver as leverage to lift it open. Or simply turn it and it will open easily. This method is best for small buckles with thin center bar.
Look at the picture below, which explains where to insert the tip:

The other way involves using pliers, but again, you will need very small, jeweller's pliers. Otherwise you may scratch the buckle, if not destroy the brittle piece completely.
Insert one end where the prong closes around the central bar. Hold the other end of the prong. Bend it open until you can see there is enough space for the bar.
Here are a few pictures to illustrate the process.
 |
| You have to make sure there is enough space in between the pieces. If not, try with the screwdriver. |

If your buckle is big and chunky, or the central bar very thick, you should go for the pliers, as the screwdriver may not be enough. On the contrary, if the prong is closed very tightly around the central bar, you will rather need a screwdriver. Also, you can combine both methods, and begin with the screwdriver and finish with the pliers.
 |
| Ready! |
Also, I recommend you keep the prong. You never know, maybe one day you get a belt buckle which you really like, but without a prong. You will have a perfect one to fit!
Subscribe to:
Posts (Atom)